- You can take a screenshot on a Mac computer in three different ways.
- Using the Command and Shift keys, you can screenshot part of your screen, a particular window, or the entire screen at once.
- The screenshots you take on your Mac will be saved to your desktop by default, but that can be changed at any time.
- Visit Business Insider’s homepage for more stories.
If you’re a new Mac owner, or you’ve owned a Mac for a while and never figured out how to screenshot, it’s worthwhile to take a moment and learn.
The screenshot bandwagon is really worth hopping on, mainly because it’s a great way to keep records. Whenever I buy tickets for a show, schedule a bill payment, or make an appointment anywhere, I screenshot the confirmation.
Taking a screenshot on a Mac is also a pretty good way to save pictures if you’d rather not take the time to download them.
Whether you’re a proficient Mac user or a Mac newbie, here are the methods you can use to take a screenshot on your MacBook, iMac, or Mac Mini.
Check out the products mentioned in this article:
Apple Macbook Pro (From $1,299.00 at Apple)
Apple Macbook Air (From $999.00 at Apple)
How to screenshot part of your screen on a Mac
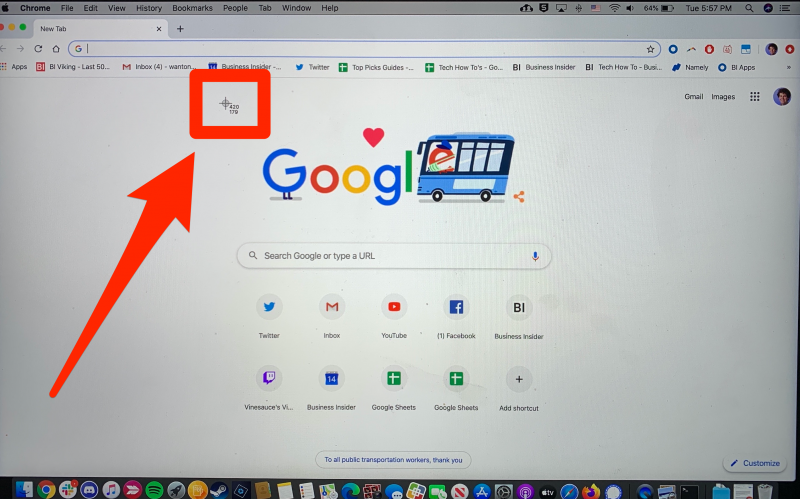
1. Press Command + Shift + 4 on your keyboard. And yes, you have to press them all at the same time.
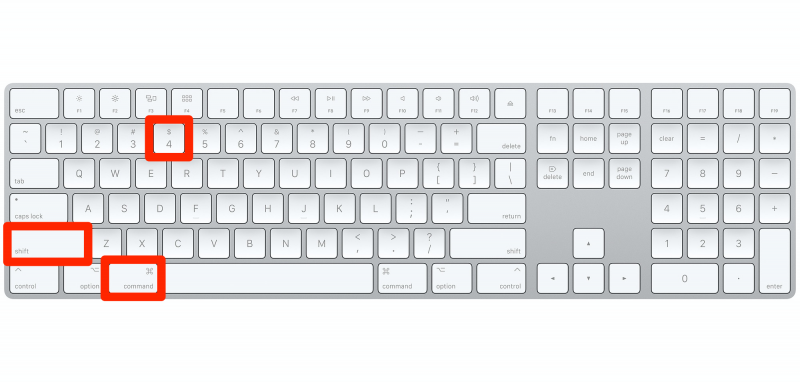
2. Click and drag your mouse cursor - which will have now become a target icon - over the area you want to screenshot.
3. When you have the right selection lined up, release your mouse. Your Mac will make a snapshot sound, and a preview of your picture will appear in the lower-right corner. After a moment, it'll disappear, and your picture will be saved to the desktop.
It will be labeled with the words "Screen Shot" followed by the date and time of your screenshot, down to the second.

4. If you're in the middle of step two and decide you're disatisfied with your crop, or for any other reason, you can stop screenshotting by pressing the Escape key on your keyboard. No picture will be saved.
How to screenshot a particular window on Mac
1. Starting out the same way, press Command + Shift + 4 on your keyboard.
2. When the target icon shows up, press the space bar to turn the target icon into a camera icon.
3. Hover the camera icon over any open window, menu, bar, or your dock and click to take a screenshot of that particular window. (The window will light up blue when you drag the icon over it.)
4. Your screenshot will save to your desktop in the same manner as before.
How to screenshot your whole screen on Mac
1. Press Command + Shift + 3 on your keyboard.
2. Your entire screen, including your dock, any windows you have visibly open on the screen, and the toolbar at the top of the screen, will be saved as a screenshot on your desktop. Your mouse will now appear.
All three of these methods save screenshots to the desktop. However, you can change this at any time.
Related coverage from How To Do Everything: Tech:
-
How to copy and paste on a Mac computer, and from a Mac to other Apple devices
-
How to password protect any folder on a Mac computer to keep your files private
-
How to mirror your iPhone's screen onto a Mac computer, using QuickTime or a third-party program
-
How to connect your Mac computer to a TV, and use a TV as a mirrored screen or second monitor
-
How to enable cookies on your Mac computer to save passwords and store other important information